After my ‘blanket terror‘, I was searching the internet for a self-joining blanket, that is, one with squares that could be joined as you went along, rather than leaving the making up to the end.
I came across instructions on the blog NB Waiouru and have followed their instructions to produce my ‘part blanket’ shown in the image above. The great thing about this blanket is that it is really quick and neat, with lots of scope for different designs.
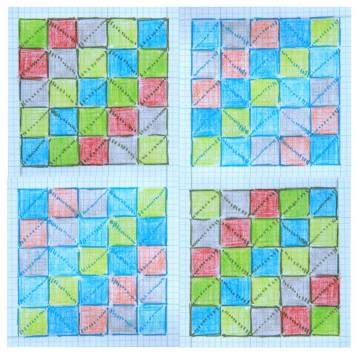
Here is the design of what I intend to knit. There are four parts with complementary colour patterns. I think I will put a border around each part, but I’m not sure what colour border yet. Note the lovely ridges in each square, which makes an attractive pattern and also gives the blanket some strength and helps it to hold its shape.
I thought I would help out with some more photos and diagrams to show others how to make this blanket, because it can get a little confusing! I’ll put the instructions on a couple of blog posts over the next few weeks.
INSTRUCTIONS FOR THE FIRST ROW OF SQUARES:
Materials
8 ply or DK/Light worsted yarn—a soft acrylic is best for both comfort and durability
4mm knitting needles
Abbreviations
k knit
sts stitches
sl slip the stitch
ktbl knit through the back loop of the stitch
k3tog knit 3 stitches together
To make
First square: Cast on 49 sts. (You can cast on any odd number of sts. 49 sts makes a square of approx 10-12 cm)
1st row: Knit to end
NOTE: In every subsequent row (until you finish the square) sl the 1st stitch and ktbl on every last stitch. This creates neat edges on each square, making it easier to pick up stitches to join the squares.
2nd row: K 23 sts, k3tog, k23 sts
Next and every odd row: Knit
4th and every even row: Knit in the same pattern as row 2, but reduce the number of stitches knitted either side of the k3tog by 1 each row. So:
- the 4th row is K 22 sts, k3tog, k22 sts
- the 6th row is K 21 sts, k3tog, k21 sts
- the 8th row is K 20 sts, k3tog, k20 sts
- and so on.
Continue in this manner until one stitch is left. Change your colour in readiness for the second square.
Second square: Knit the one stitch with your new colour. Pick up 24 sts along the left-hand side of this stitch. NOTE: there are different ways to pick up stitches. My way is to poke the needle in through holes underneath the edge. Good instructions for picking up stitches along a garter stitch sample here.
Continue along to the left and cast on 24 sts (makes 49 sts in total). Knit one row. Commence instructions above at 2nd row.
That’s it for the first row of squares! Just keep repeating these instructions for the length you require. In my pattern there are five squares in the first row. Below there are some images of the work in progress.
1. First square in progress. 2. First square complete. 3. Picked up stitches for second square. 4. Cast on stitches = 49 sts for second square
5. Second square complete. 6. Picked up and cast on stitches for third square. 7. Picked up and cast on stitches for fourth square. 8. Picked up and cast on stitches for fifth square.


Although this blanket pattern seems easy. At the same time it also seem confusing n difficult to do the next square and so on…
I guess I’ll have to give it a try practically because I’m finding it hard to visualisee rIght now reading ur pattern. Thank you for ur unusual blanket pattern any way Regards Sandra
Haha I wrote this pattern when I was just a beginner knitter! I later found out that it’s a pretty standard modular technique so you’d probably find a simpler version in a modular knitting book. Good luck with it! Cheers, Deidhre
Hi,
Is it possible to knit the squares separately each one and then connect them? If so how do you recommend connecting them? and how to connect tham Sewing with a needle or crocheting?Thanks and have a wonderful day
Gila Maor
Hi Gila
Yes it’s fine to knit them separately and then join with crochet or (e.g.) sew with mattress stitch or blanket stitch. I find that joining in that way creates a bulkier seam, but then I’m not much of a seamstress and my crochet skills have developed but the seam then looks very obvious – good if you want to make a feature of the seam. The other thing I like about joining as you go is that you don’t get to the end of the knitting part and then have to sew all the little squares together!
Cheers
Deidhre
It’s great, I love the pattern-whoever created it deserves a medal!